A mobile home shower surround is a different size and a different wall than a house. What the HUD code requires, and the seal that protects your floor.
- Filed under
- Interior & Remodeling
- Code cited
- 24 CFR 3280.607, 3285.804
- Sources
- 2 listed
- Includes
- 2 figures
- Reading time
- 7 min
The unit you take out will not match anything on the shelf at the home center, and a mobile home shower surround bought there will not fit the hole you just made. That is the whole problem in one sentence, and it is worth understanding before you buy anything.
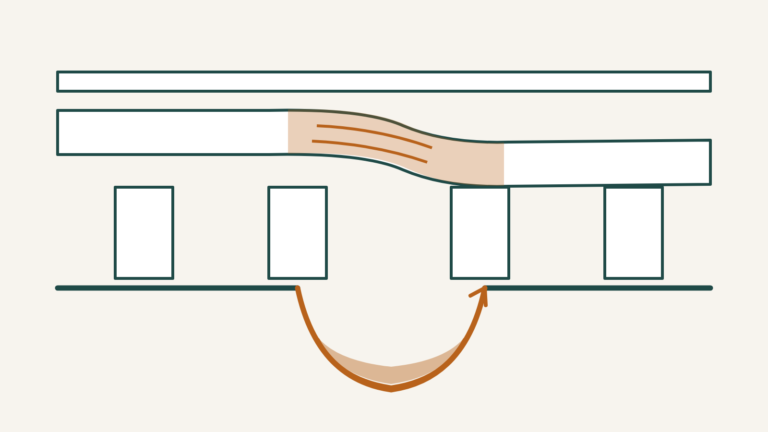
There is a second thing worth knowing, and it costs more than the surround: the joint where the walls meet the pan is what stands between your shower and the floor underneath it.
The sizes are not the ones in the catalog
Manufactured home bathrooms were laid out for transport width, not for a plumbing catalog. The bath that comes out is commonly 54 by 27 inches, against the 60 by 32 of a standard site-built alcove tub. Shower units come in sizes the big retailers simply do not stock — 32 by 32, 36 by 36, 54 by 27, 54 by 30, 54 by 42.
Measure the opening before you shop, and buy from a manufactured home parts supplier rather than trying to make a standard unit work. Retrofit kits for standard framing assume a 76-inch rough opening for a 60-inch tub; yours is not that.
What the HUD code actually requires here
This is the section that tells you why the job matters. 24 CFR 3280.607 requires that the wall area around a shower be “constructed of smooth, non-corrosive, and non-absorbent materials to a height not less than 6 feet above the bathroom floor level,” and — the important half — that those walls “form a watertight joint with each other and with the bathtub, receptor or shower floor.”
Watch that six-foot measurement when you shop. A common 32 by 32 kit has 69-inch wall panels, which on its own is short of 72 inches; with a pan around 5½ inches tall the assembly clears it. Check the arithmetic on the unit you are buying rather than assuming.
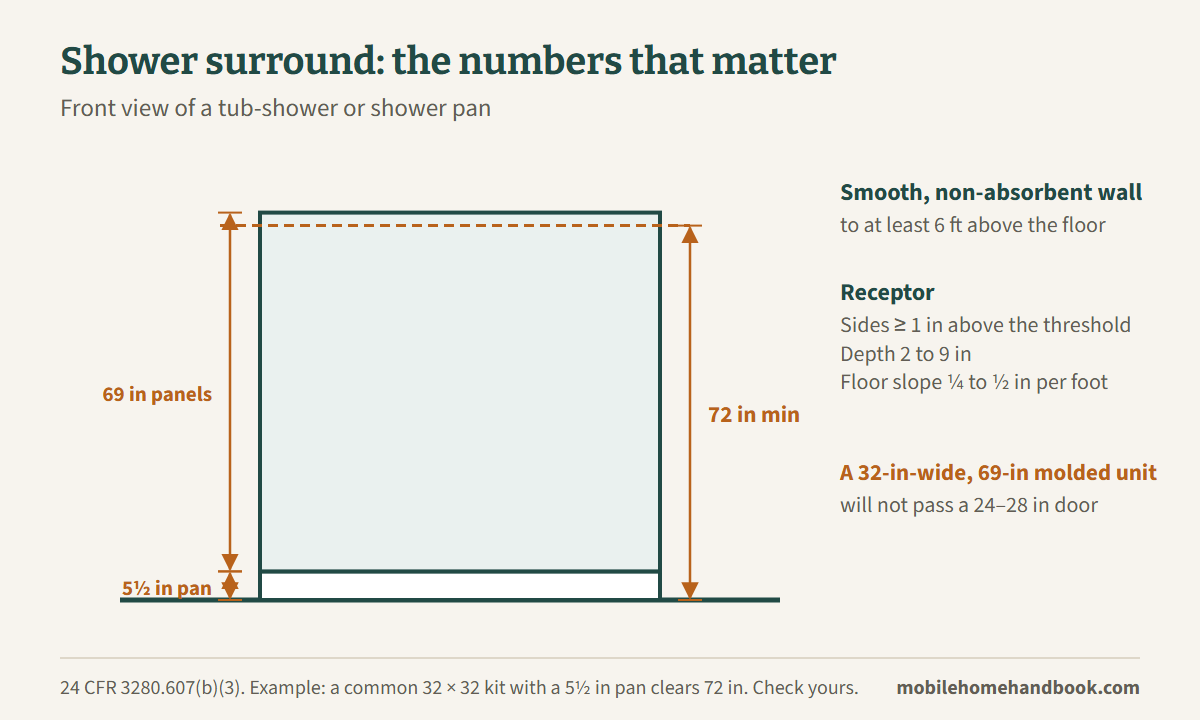
The same section requires the receptor to be watertight with sides and back extending at least an inch above the finished threshold, a depth between 2 and 9 inches, and a floor slope between a quarter and half an inch per foot. It also requires the drain connection to be made watertight “by a flange, clamping ring, or other approved listed means.”
Why a one-piece mobile home shower surround is not an option
A one-piece surround in a manufactured home is almost always a demolition job rather than a replacement. The arithmetic is simple: a 32-inch wide, 69-inch tall molded unit does not pass through a 24 to 28-inch bathroom door.
That is exactly why three and five-piece kits exist. A patent for multi-piece tub and shower units describes the constraint plainly — the older designs had to be bolted together before installation because the bolting was done from behind, and “in a small 5’×7′ bathroom, this is an impossible task.”
Buy the multi-piece kit. It is not a compromise; it is the product designed for the situation you are in.
The wall behind it is not drywall
What is behind the old surround is a gypsum panel made for this industry, typically 5/16, 3/8 or 1/2 inch thick and faced with vinyl at the factory — thinner than the half-inch board in a house, and finished rather than taped.
The studs behind that are not standardized either. The federal standard is performance-based here: it requires wall finish to be securely fastened and partitions to resist a horizontal load, but it sets no stud spacing. Your framing may be 2×3, 2×4 or 2×6 at whatever spacing the manufacturer used. So measure; do not assume 16 inches on center.
If the wall behind is soft or stained, stop and deal with that first. A new surround over wet framing is a new surround you will remove again.
The joint that protects your floor
This is the part that justifies the whole article, and there is a HUD case study behind it. In its research on moisture in manufactured homes, HUD describes how a poorly sealed bath “can allow gallons of water to pool on the bottom board,” and left unchecked “could rot out a large section of floor materials.”
Three details do the work:
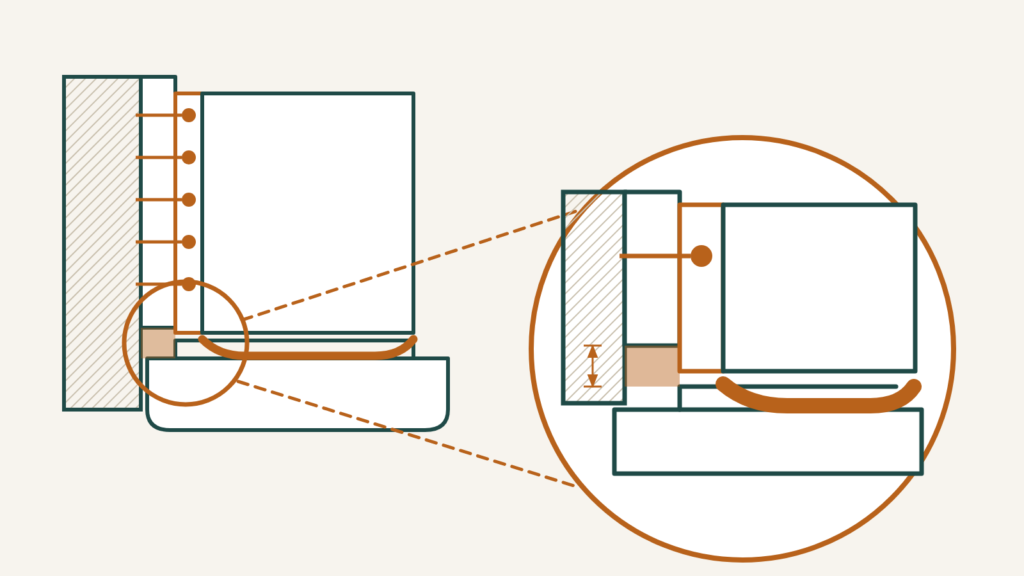
The flange gets fastened to framing. Manufacturer instructions call for large-head roofing nails through the dimples provided, starting at the bottom of the end walls and working up, then across the top at every stud location.
The wall material overlaps the flange, with a gap. Instructions specify covering the framing with water-resistant wall material applied over the flange, “leaving a 1/4″ (6mm) gap between the bath rim edge and the wall material.” Independent tile-industry guidance says the same, with a range of 1/8 to 1/4 inch, filled with a backer rod and an ASTM C920 sealant — and warns that without the overlap, “water has a way to get into the wall cavity.”
Then it gets sealed. Silicone at the seam where walls meet the pan, where panels interlock, and along the bottom edge.
Where the flanges do not sit flat against irregular framing, shim behind them before fastening. That is the documented fix for exactly the problem a manufactured home wall presents.
If you touch the drain, you owe the belly a repair
Reaching the P-trap often means opening the bottom board underneath. 24 CFR 3285.804 then tells you how to close it properly: replace any missing insulation before closing, reseal splits and tears with tape or patches, check that P-traps are insulated and covered, and tape or seal all edges of the repaired area.
Worth knowing while you are in there: full S-traps are prohibited, traps need a water seal of 2 to 4 inches, and concealed slip joint connections require an access panel.
Permits, which surprise people
In a manufactured home the permit usually goes through the state housing agency, not your city building department. That catches almost everyone.
Washington’s guidance lists “replacing fixtures” as requiring a permit, and defines fixtures to include tubs and showers — its no-permit exception for like-for-like replacement covers only sinks and toilets. California requires a permit to install or modify a bathtub or shower, or the drain, waste and vent piping, and separately lists interior wall covering as permit work.
Two states are not the country. Check yours before you start, not after.
What it costs
Orientative figures, from a manufactured home parts supplier and a national cost estimator rather than any public dataset: shower pans alone run roughly $220 to $790 depending on size, complete pan-plus-surround kits $760 to $1,400, and installation of a surround around $770 to $960.
Common questions
Can I use a standard tub instead?
Only if it fits the opening, which usually means rebuilding the alcove. That turns a swap into a bathroom remodel.
Do I need to replace the pan as well as the walls?
Not necessarily, but matching a new surround to an old pan is where leaks start. If the pan is original and the home is old, doing both once is usually cheaper than doing each separately.
Is the floor under my shower already damaged?
Look from underneath before you commit. A sag or wet patch in the belly under the bathroom answers the question without cutting anything.
Sources
How we researched this: compiled from the federal HUD Code (24 CFR 3280 and 3285), listed above. Links checked October 22, 2026. This guide is research, not a site inspection, and has not been reviewed by a licensed installer or contractor.